Thank you for purchasing my plugin. If you have any questions that are beyond the scope of this help file, please feel free to email at opencartmart@gmail.com. Thank you so much!
What it is?
X-shipping pro is a Advanced shipping module. If you want to define your own shipping method and price, this module is the perfect solution. In this module you can create your own shipping method and give the method name what you want.
Installation
Opencart 3.x
- First unzip downloaded zip file. You will get another zip file named get xshippingpro.ocmod.zip
- Please Go to Admin -> Extensions -> Extension Installer. Upload "xshippingpro.ocmod.zip" and click on continue.
- Now please navigate to admin -> Extensions -> Shipping. Now click on Install button located beside X-shipping pro row.
- Congrats! You are done. Now it is ready for adding shipping method.
Opencart 2.x
- First unzip downloaded zip file. You will get another zip file named get xshippingpro.ocmod.zip
- Please Go to Admin -> Extensions -> Extension Installer. Upload "xshippingpro.ocmod.zip" and click on continue.
- Now please navigate to admin -> Extensions -> Shipping. Now click on Install button located beside X-shipping pro row.
- Finally, go to Admin -> Extensions -> Modifications and now click on "Refresh" button
- Congrats! You are done. Now it is ready for adding shipping method.
Opencart 1.x
- First unzip downloaded zip file. You will get two files there 1. Upload 2. readme.txt
- Now upload all files and folders from the "upload" directory at your opencart directory on the server.
- NO FILE will be overwritten
Setup Your Shipping
Lets create your first method. Please navigate to Extension -> Shipping. Now click on Edit button beside xshippingpro
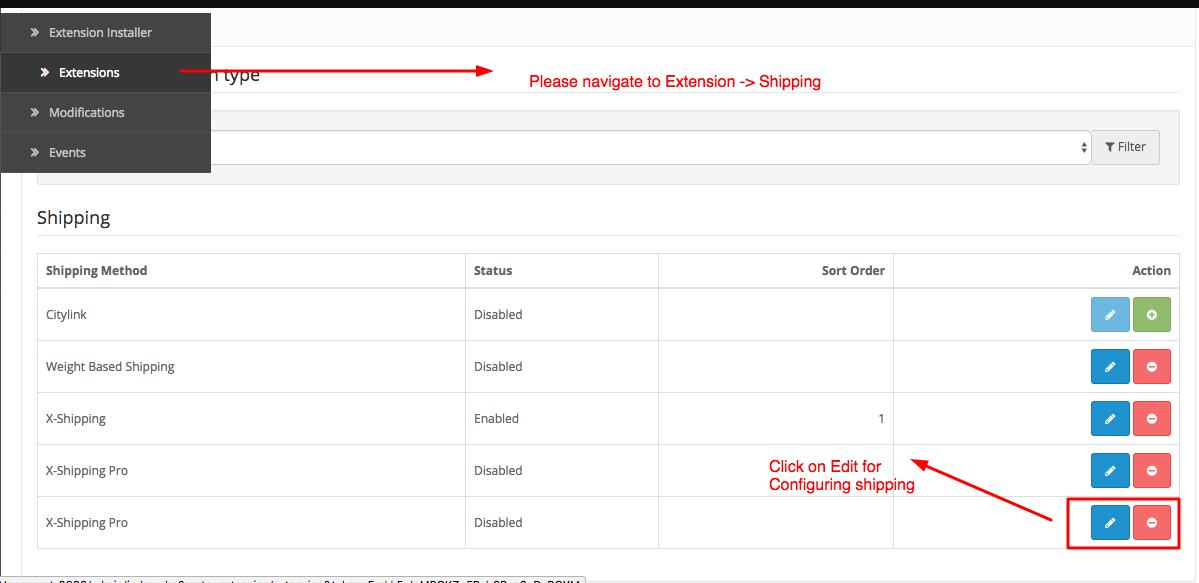
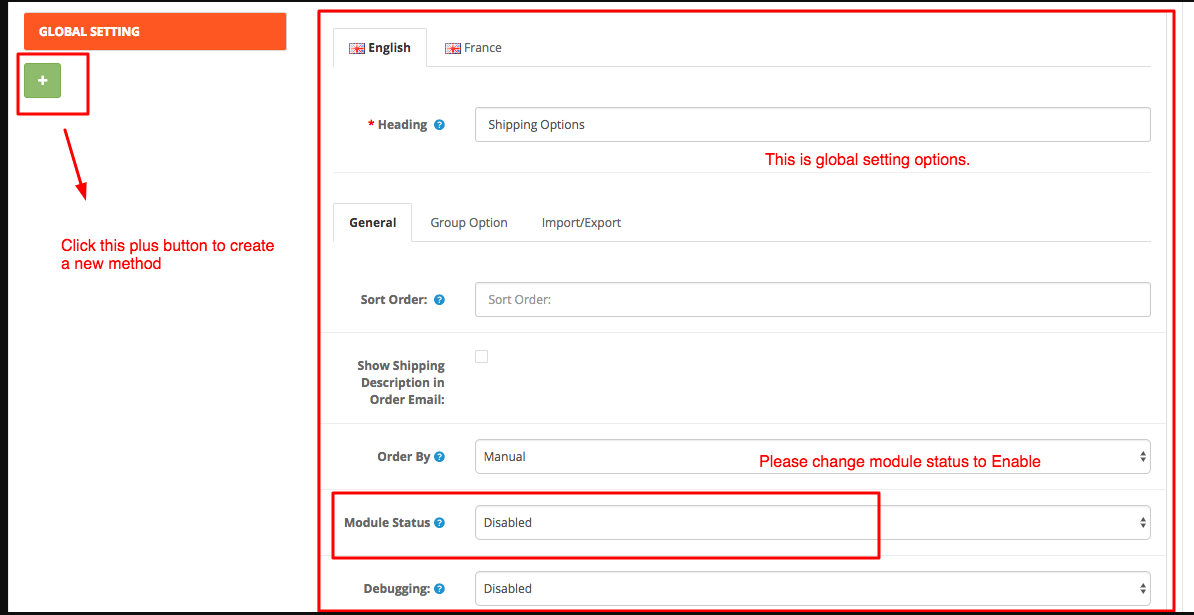
You will get first screen like the screenshot below. You will get all global options in the right side and shipping list in the
left side. Still you don't have any method so it is empty. Now click on Plus button to create first method.
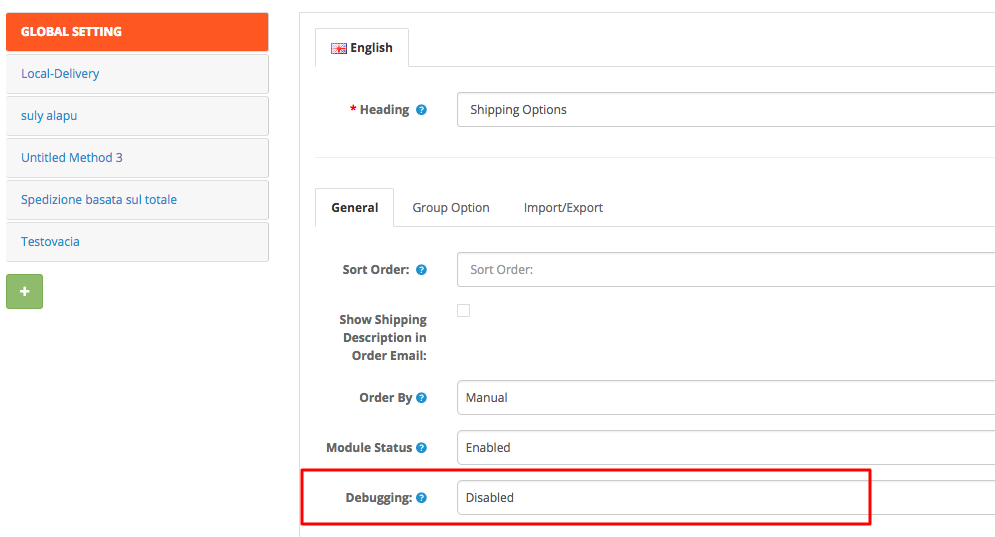
In Global setting, Please change module status to Enable to activating module.
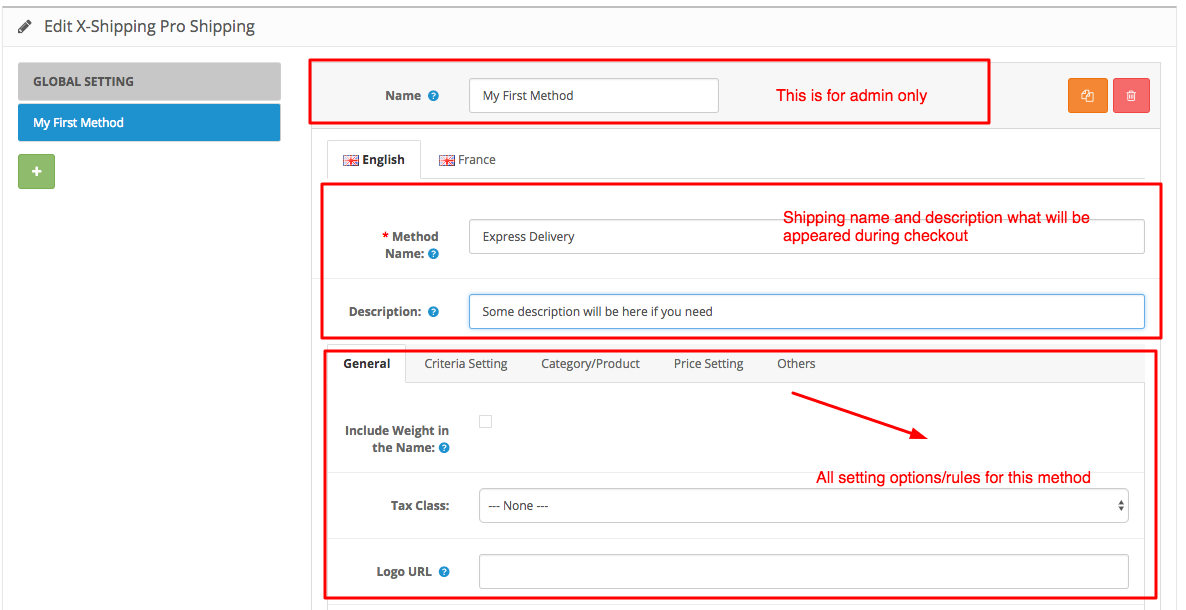
Now you have got your first method like below. Enter you shipping display name and method name. Display name is for the admin user only. It helps you to remeber shipping method as an alternative name in admin. Method name is the actual name that would appear during checkout out. So enter your shipping method name what you like. For example: Express Delivery
One thing is very important to understand that all rules/options available for a method would work as logical AND mode if you entered. So choose your shipping rules what you need, otherwise keep its default value. We are keeping all rules as default value for the first method except Price. So please navigate to Price setting tab, Now enter Shipping By is Flat. Then enter shipping cost is 100

Now you are done. You have just created your first method "Express Delivery". You will get it now during checkout in the site.
Shipping Rules/Options
Xshippingpro has a lot of rules or option. Noted that all rules would be considered as logical AND mode. It means if you chose Rule1 and Rule2 for a method, then that method would appear only when both Rule1 and Rule2 validates true. So choose your rules carefully and accordingly.
Here are options available to each tab.
General
This tab contains some basic information of a shipping method, these are not rules actually except Group. Please learn about Group option for knowing about this rule deeper.
- Include Weight in the Name: If you check this option, it will show cart weight with method name in the site.
- Tax Class: If you want to apply tax/vat with shipping cost, please select tax class here.
- Logo URL: Method Logo. It needs OCMod to work.
- Sort Order: Set ordering among your xshipping methods. This field is also used by method grouping feature. Please check Group mode section
- Status: Enable/Disable method
- Select Group: For method grouping. Please check this article about Group mode
Generic Rules
- Store: Choose applicable stores this method would be available with.
- Geo Zone: Choose applicable GEO zone this method would be available with.
- Country: Choose applicable countries this method would be available with.
- Customer Group: Choose applicable customer groups this method would be available with.
- Payment Method: Choose applicable payment methods this method would be available with. This rule has dependancy on checkout module. It will not work with all checkkout modules. Currently it works with journal checkout, quickcheckout by dreamvention
- Manufacturer: Choose applicable manufacturer this method would be available with.
- Zip/Postal: Choose applicable zip/postal codes this method would be available with. Please check this article to know more details about postal rules.
- Coupon: Choose applicable Coupon codes this method would be available with.
- Days of Week: Define the days for those you want to show this method. It would not appear for non selected days.
- Time Period: Define time period for that you want to show this method. It would not appear for non selected time period.
Product Rules
Please check this table summary to understand the difference.
Also, You can check this post to know more details about various product rules
- Category Rule: Select your appropiate category rule, then choose your categories accordingly.
- Product Rule: Select your appropiate Rule rule, then choose your Products accordingly.
- Manufacturer Rule: Select your appropiate manufacturer rule, then choose your manufacturers accordingly.
- Attribute Rule: Select your appropiate product attribute rule, then choose your attribute accordingly.
- Product Option Rule: Select your appropiate Option rule, then choose your Options accordingly.
- Location Rule: Select your appropiate location rule, then choose your product locations accordingly.
Price Setting
| Shipping By | Explanation |
| Flat Amount | A fixed/flat shipping cost. Percentage is available. For example: 25 Or 15% |
| Range Options. You can define shipping cost by the range. | |
| Quantity | Shipping cost by quantity range |
| Weight | Shipping cost by weight range |
| Volume | Shipping cost by volume range |
| Dimensional Weight | Shipping cost by dimensional weight. Dimensional Weight = (volume / factor) x weight |
| Volumetric Weight | Shipping cost by volumetric weight. Volumetric Weight = (volume / factor) |
| SubTotal | Shipping cost by SubTotal range |
| SubTotal + Tax of SubTotal | Product Total including its tax. |
| SubTotal + Tax of SubTotal - Coupon/Reward Value | Product Total excluding Coupon/Reward Value |
| Summed Total Before Shipping | Order total before shipping |
| Grand Total | Grand Total of the whole order excluding shipping cost |
| No. of Categories | Shipping cost by the number of unique categories of the shopping cart |
| No. of Manufacturers | Shipping cost by the number of unique manufacturers of the shopping cart |
| No. of Locations | Shipping cost by the number of unique product locations of the shopping cart |
| Equation Value | Shipping cost will be calculated by the value retured by defined equation. |
| Per Product | You can define cost to every products separately. |
| Distance | Shipping by actually distance from Store to Delivery address. You must define your Google map API key in the xshippingpro global setting and your store GEOCODE on the store setting. |
-
Lets look detail unit range fields for each row.
Start End Cost Per Unit Block Partial Block Starting Value of the range. Type of value would decide depending on `shipping by`. For example, if the `shipping by` is Quantity, Starting value means starting quantity of that range. For example, if you want to charge $10 for the first 1 - 5 items, 'Shipping By' would be Quantiy and starting value would be 1. Ending Value of the range. In our last example, End would be 5 Cost of the row. According to our example, Cost would be 10 Define how do you want to charge for each unit? Unit would be decieded based on 'Shipping By'. For example, if `shipping by` is Quanity, then unit would be Quantity. It is just generic name of the `shipping by`. For example, if you want to charge $10 of every pair of items, then, Per unit block would be 2. If you want to charge $10 for each item, then Per Unit Block would be 1. If you don't need Per unit based cost, just enter 0 to ignore. Define how to treat if it finds the partial block. The `Ceiling` rounds up to the next block, the `Flooring` ignore the fraction value and the `Fraction` will count block with the fraction value. Ignore this option if the `Per unit block` is zero or empty - Additional Price: Getting tired of entering too many unit rows? This option can help you in that case. This option will continue calculating shipping cost once the unit row/range reaches at its end. If there is no Unit Rows are defined, then it will simply calculate shipping cost based on Additional Price setting.
For Product Based shipping, these fields will be treated as shipping cost for all non-listed products.
Example: Let's consider a scenario where you want to charge shipping cost $10 up to 5 KG and extra $2 per KG for additional weight after 5KG.
To configure above case, in the price setting, we have to select 'Shipping By' is weight and have to added following unit ranges:Start End Cost Per Unit Block Partial Block 0 5 10 0 Ceiling
Now when it comes to additional cost, we can use Additional Price option. So we will simply put 2 to additional price field and 1 to Additional Per unit block field. That's all. Isn't aswsome?
- Final Cost: You can define how the unit rows would be treaded if you have multiple unit rows. Lets consider 'Shipping By' is Quantity and we have following Unit ranges:
Start End Cost Per Unit Block Partial Block 0 5 15 0 Ceiling 6 20 10 0 Ceiling
Let's consider again, one customer want to purhcase 7 items, so what would be shipping cost?
Well, we have two scenarios in our hand from above unit ranges:
Scenario 1: Shipping cost would be $10 because items 7 fall under the second row.
Scenario 2: We can sum up the cost of each row cumulatively until we find desired row. Since items 7 falls under the second row. So we will add up cost of first row and second row, First Row cost is $15 and Second Row cost is $10. So cumulative cost would be: $25
Final Cost can be either Single or Cumulative where single denote first scenario and Cumulative denotes later one
- Percentage Related to: Define how xshippingpro will calculate percentage value. If you select Total, then 5% means 5 percent of cart total.
- Price Adjustment: You can force redefine your final cost using this option. For example, if you want your minimum shipping cost must be $5 irrespective of any price setting. Then enter Min is 5. If you want maximum shipping cost $100, then enter Max is 100. Also sometimes you may need to modify your shipping cost in other way. For example, You want to add some extra charge with final shipping cost. Then you can use Modifer option. If I enter +5 into modifier field, it means it will add $5 with final shipping cost. You can use -5 or *5 or /5 etc. Also you can use percentage value like 5%
- Final Equation: It is also some sort of Price redefining option. You can enter any arithmetic equation to calcualte your final shipping cost. For example: if the equation is {quantity}*10 and cart quantity is 5, then shipping cost would be $50. Available parameters:
Placeholder Explanation {subTotal} Cost of all cart's products {subTotalWithTax} Cost of all cart's products including tax {weight} Weight of all cart's products {quantity} Quantity of all cart's products {volume} Volume of all cart's products {subTotalAsPerProductRule} Cost of the products those are valid according to the products rule. {subTotalWithTaxAsPerProductRule} Cost of the products including tax which are valid according to the products rule {weightAsPerProductRule} Weight of the products those are valid according to the products rule. {quantityAsPerProductRule} Quantity of the products those are valid according to the products rule. {volumeAsPerProductRule} Volume of the products those are valid according to the products rule. {shipping} Evaluated shipping cost of this method before equation {modifier} Value of the Modifier of the price adjustment section {noOfCategory} Number of different Category {noOfLocation} Number of different Product Locations {noOfManufacturer} Number of different Product Manufacturers {couponValue} Applied Coupon Value {rewardValue} Applied Reward Amount {minHeight} Minimum height of the cart's product {maxHeight} Maximum height of the cart's product {sumHeight} Total height of the cart's product {minWidth} Minimum width of the cart's product {maxWidth} Maximum width of the cart's product {sumWidth} Total width of the cart's product {minLength} Minimum length of the cart's product {maxLength} Maximum length of the cart's product {sumLength} Total length of the cart's product
Event/Condition
- Disable Store Shipping:Make store shipping unavailable when this method become active
- Hide Others On Show: Make unavailable other shipping methods on the time of showing itself.
- Hide Others On Hide: Make unavailable other shipping methods on the time of dying itself.
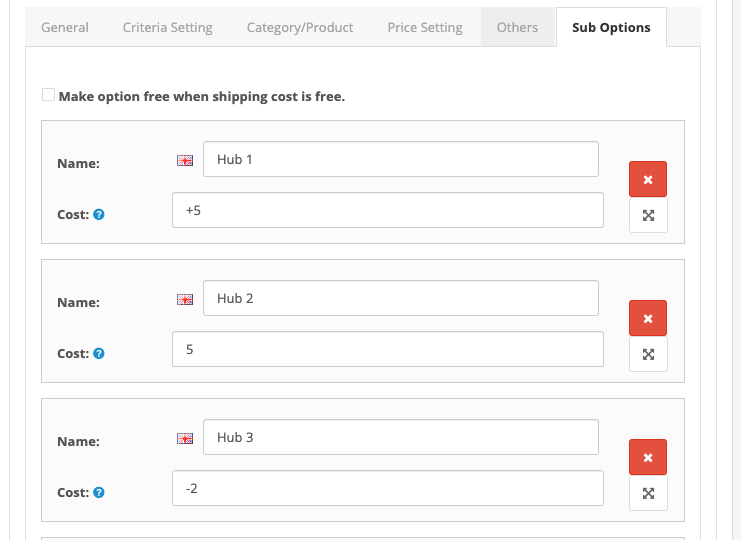
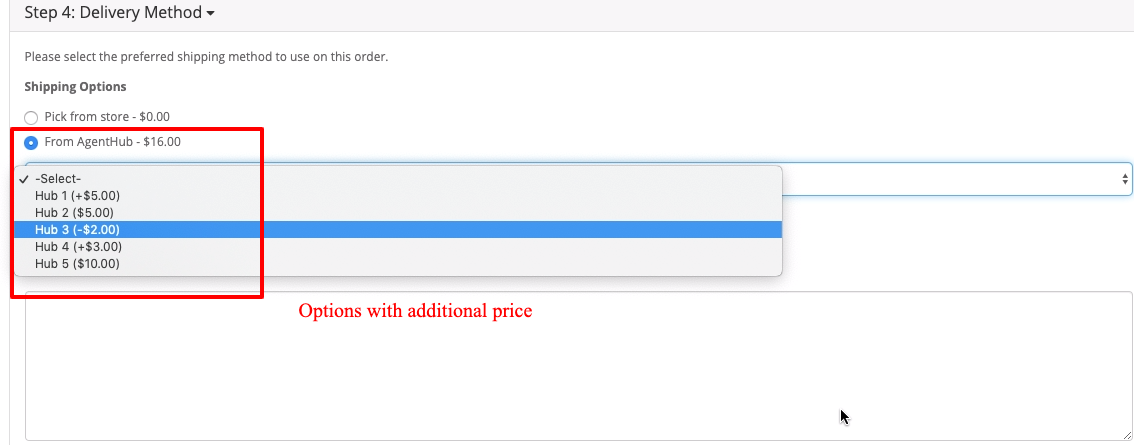
Shipping Sub-Options
X-Shippingpro's Sup-Options allows you define additional options under the same method that would appear as a dropdown during checkout. You can also define additional cost to the option. Option cost can be added or substracted from main shipping cost OR replaced the main shipping cost. For example: +10, -10 10 which denotes additiona, substruction and replacement respectively.
Multi-Level Sub-Options
If you want to generate multi-level dropdowns, it is required to enter all sub-options with level information. For example,
1 USA
2 Canada
1.1 California
1.2 Georgia
1.3 Texas
2.1 Alberta
2.2 Manitoba
2.3 Ontario
2.4 Quebec
The above list will generate two level of dropdowns.
By default, each dropdown starts with a default option -Select-. If you want to change it to a different value, you can do it by adding a pipeline(|) sign at the top-level options for the first items only. For example, if we wanted to have custom top option, it would have like below:
1 USA|-Country-
2 Canada
1.1 California|-State-
1.2 Georgia
1.3 Texas
2.1 Alberta
2.2 Manitoba
2.3 Ontario
2.4 Quebec

Distance Based Shipping
Please complete the following steps to get the distance-based shipping working:
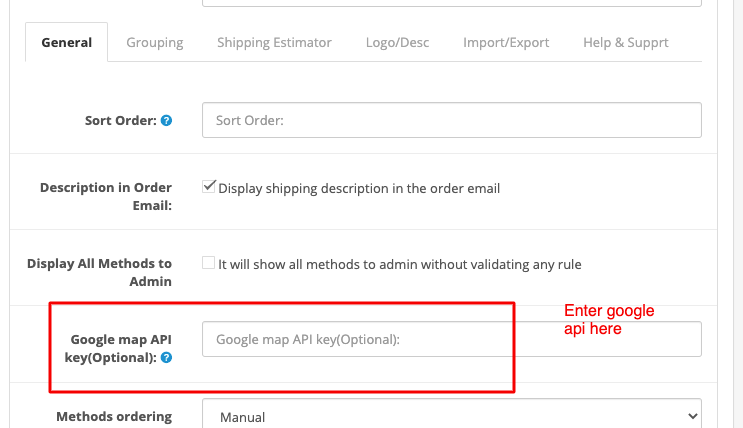
- Please enter your google map distance-matrix API key in the X-Shippingpro global setting. If you don't have API key yet, you can get it from google map api https://developers.google.com/maps/documentation/distance-matrix/get-api-key
- You must set your store Geocode in the store setting. This GeoCode will be used as the starting point of the distance.

- Now you can select the `Shipping By` to `Distance` in the price-setting tab of the method you want `Distance-based` Shipping.
Shortcode in Shipping Description
There are some shortcodes available that you can apply in the shipping description. Here is the list of shortcodes currently available:
| Shortcode | Description | Available Options | Example |
|---|---|---|---|
| date | This shortcode can be used to display a future/past date in the shipping description. For example, if you want to display a date after the three days of the current date, the shortcode will be [date]3[/date] |
format - Any valid php date format offday - If you want to exclude any days from calculation like the weekend, you can put it as a comma-separated value. You have to enter numerical presentation of the weekday where 0 denotes the Sunday and 6 is the Saturday. e.g. offday="6,0" means Saturday and Sunday will be excluded from the calculation. Valid values are: 0 to 6 SUN = 0 MON = 1 TUE = 2 WED = 3 THR = 4 FRI = 5 SAT = 6 mode - Available values are `next` and `prev` to indicate future and past date respectively. The default value is next same_day - The boolean value true/false. It is used to indicate whether the current date will take into account or not same_day_limit - If the same_day is true, then you can set the maximum hours limit to call it as the same day. Valid value is: 0 to 23 e.g. 24 hour fomat. Example: same_day_limit="12" represents the limit 12:00 PM offset - offset in hours. This is available when the provided value is a string instead of a number. Please check following: For example: [date format="d M Y"]next monday[/date] - will print the next monday [date format="d M Y"]first sunday of * month[/date] - Will print first sunday of the month. It will switch to next month automatically if the current day surpass the respective day [date format="d M Y" offset="24"]next wednesday[/date] - will print the next Wednesday until it reaches next Tuesday (24 hours ahead). After that it will count next period automatically. |
`Aproximate Delivery Date [date format="d M Y" offday="6,0"]3[/date]`. It will display the description something like `Aproximate Delivery Date 7 March 2020` |
| xform | This shortcode can be used to display any form created with the extension X-Form. Submitted data will be linked up with the order. Example: [xform]1[/xform] | N/A | [xform]1[/xform] will display the form which ID is 1 |
Example
Example 1: Setup Free Shipping for the order total greater than $500
- Create a new method and enter a name for it
- Now navigate to Price Setting Tab and select `shipping by` is Total. Then enter Unit Ranges as follows:
Start End Cost Per Unit Block Partial Block 500 999999 0 0 Ceiling
Example 2: Setup Free shipping for the category A and B when order total is greater than $500
- Create a new method and enter a name for it
- Now go to Product/Category Tab, Select category rule is Any of the selected ones. Then select Category A and B
- Now navigate to Price Setting Tab and select `shipping by` is Total. Then enter Unit Ranges as follows:
Start End Cost Per Unit Block Partial Block 500 999999 0 0 Ceiling
Example 3: Setup shipping cost $10 per item
- Create a new method and provide a name
- Now navigate to Price Setting Tab and select `shipping by` is Quantity. Then enter Unit Ranges as follows:
Start End Cost Per Unit Block Partial Block 0 9999 10 1 Ceiling
Example 4: Setup shipping cost $10 per item for the products of category A and B only.
- Create a new method and provide a name
- Now go to Product/Category Tab, Select category rule is Any of the selected ones. Then select Category A and B
- Now navigate to Price Setting Tab and select `shipping by` is Quantity - Method Specific. Then enter Unit Ranges as follows:
Start End Cost Per Unit Block Partial Block 0 9999 10 1 Ceiling
Example 5: Setup shipping cost 10% of the order total.
- Create a new method and provide a name
- Now navigate to Price Setting Tab and select `shipping by` Flat
- Now Enter Cost is 10%
- Finally, Select Percentage related to Total
Live Debugging
Live debug option is available in Admin -> Global Setting -> Help -> Live Debug.
Debugging can help you to find out why your shipping method did not show up in the site. First enable debug mode in xshippingpro global setting.
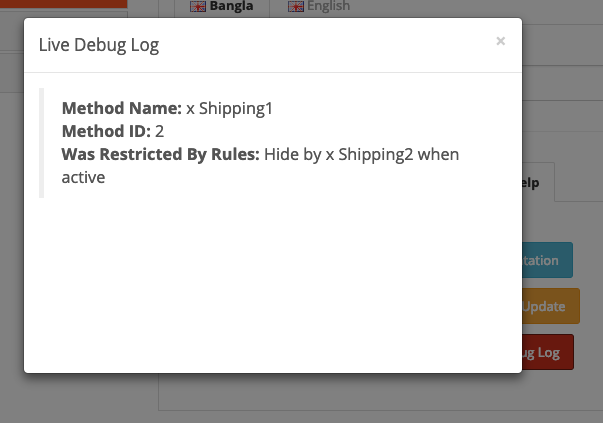
Once debug mode is ON, click the Live Debug button in Admin -> Global Setting -> Help -> Live Debug and keep the debug window open. Now try to checkout on the site or estimate shipping cost in the shopping cart page. Look get your eyes back on the debug window, it would pring rules names why a particular shipping method was not showed up.
FAQ
Q. I am not getting Xshippingpro under admin -> Extensions -> Shipping.
A. Usually happens in OC 2.x. It simply means that your Xshippingpro installation was not done correctly. Most probably your ftp root is incorrect under store setting. Please recheck ftp root under store setting and re-install xshippingpro again.
Q. I am not able to install xshippingpro through Opencart Installer in Opencart v2.x.
A. Usually happens in OC 2.x. Most probably your ftp information is wrong under store setting. Please recheck ftp root under store setting and re-install xshippingpro again. If problem persist, it could be opencart core issue. In that case you can install manually, check this youtube video.
Q. My Shipping Description and shipping logo is not showing.
A.It may be incompatilibity issue with your checkout module. Please send an email at opencartmart@gmail.com so we can check and adjust as per your checkout module.
Q. My products were entered by gram but store default weight is KG. Should I need to change all weight unit to the same unit?
A.
No. You don't need that. You must put weight ranges according to the default weight unit in the xshippingpro. For example, if your store default weight unit is KG, you will have to put weight ranges by KG.
Apparently it is not xshippingpro behiviour, opencart itself convert all weight units to the default weight unit eventually. So simply input weight ranges by your default weight unit in xshippingpro.
Q. Where can I get sample CSV file for Price and Sub-Options?
A.
Please nagivate to the Price-Setting tab of any method. Now click the `Export` button to download CSV template.
Similary, you can download CSV sample for sub-options.